Do you think push-ups are difficult?
They may look simple, but in reality, they require a considerable amount of technique. With the tips in this article, you will be able to perform proper push-ups more effectively.
Push-ups primarily target the chest, shoulders, triceps, and core muscles, making them a highly effective exercise.
You can perform them in the traditional way, but if you cannot support yourself on your toes, you can use an easier variation with your knees on the ground.
In this article, we will go through key techniques to help you master the movement and get the most out of every push-up you perform.
Hand Position
First, your hands should be placed slightly wider than shoulder-width.
Your arms should form an angle of less than 45 degrees relative to your body. Avoid flaring your elbows too wide, as this increases the risk of shoulder injury.
In addition to the standard position, there are variations with different hand widths. However, these are designed to target specific muscle groups and should only be attempted after mastering the standard push-up.
- In narrow push-ups, your elbows should point backward rather than outward. This places more emphasis on the triceps.
- In wide push-ups, the focus shifts more toward the chest and shoulders.
If you want an additional challenge, you can use push-up handles to increase the range of motion and perform these variations.
Wrist Position
Some people experience wrist pain during push-ups.
This is often due to a lack of regular movement, which is common among people who spend long hours working at a computer.
To improve wrist mobility and reduce discomfort, you can include exercises such as:
- High plank holds
- Incline push-ups
- Wrist mobility drills
These will help improve joint flexibility and reduce strain.
Head and Neck Position
You have probably seen people doing push-ups with their head dropping down or tilted upward. This is incorrect.
Your head, neck, torso, and ankles should form a straight line. The neck should remain in a neutral position to reduce the risk of strain.
How can you achieve this?
A simple cue is to focus your gaze on a point a few feet in front of you and keep your eyes fixed on it throughout the movement.
Regression Options
What if you cannot perform a standard push-up on your toes?
You can start with easier variations.
Begin with a wall push-up:
Stand upright facing a wall with your arms extended. Lower your chest toward the wall, then push yourself back using your arms. This helps you build strength and become familiar with the movement.
Once you are comfortable, progress to knee push-ups.
Knee push-ups are easier because they require less core strength and less effort to push your body upward.
Finally, move on to the standard push-up:
- Keep your toes firmly planted on the ground
- Engage your core
- Maintain a straight body line
- Keep your elbows at about a 45-degree angle
- Tighten your legs and glutes to prevent your hips from sagging
- Keep your hips and shoulders aligned
If you cannot push yourself up at first, that is fine.
Focus on maintaining a tight core and a straight body, then slowly lower yourself until your chest approaches the ground. From there, use your elbows and arms to push yourself back up.
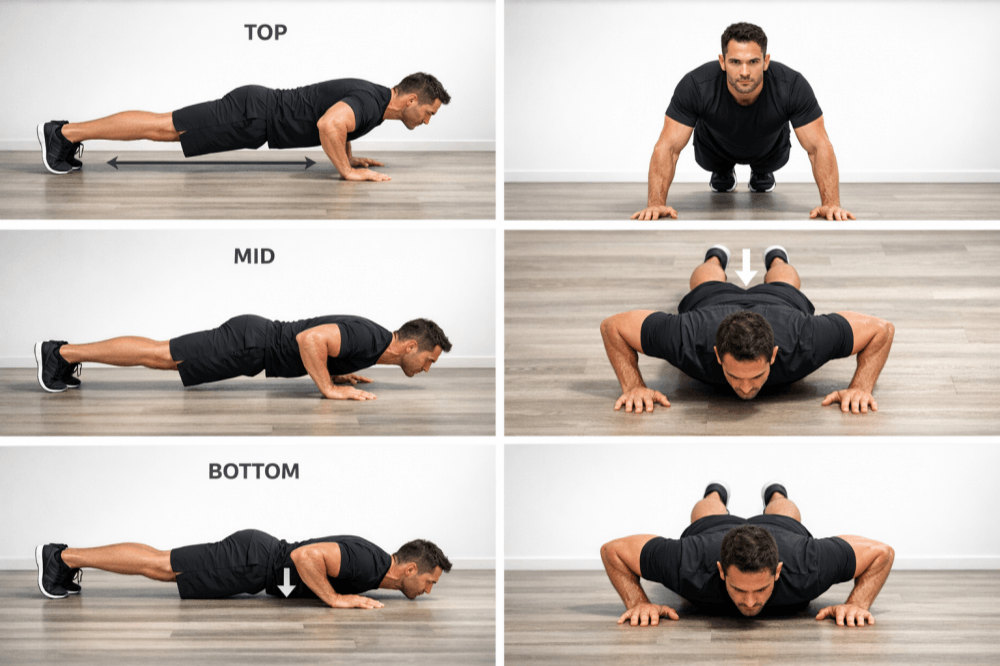
Quality Over Quantity
Push-ups are about quality, not quantity.
You should aim to accumulate high-quality repetitions rather than simply doing more reps.
A common mistake is performing only partial repetitions, which limits chest activation.
At the bottom position, your elbows should reach approximately a 90-degree angle or align with your shoulders.
Advanced trainees may lower their body further, but unless you can do so comfortably and with control, it is not recommended.
Another common mistake is not pressing all the way up.
You should push until your arms are fully extended, without forcefully locking the elbows.
Progression
Once you have mastered the standard push-up, you can begin exploring variations.
However, you should first be able to complete at least 15 proper push-ups.
The advantage of push-ups is that you can always adjust the difficulty:
- Try different variations(View 10 Different Push-Up Variations)
- Add weight on your back
They can be used as a standalone exercise, or incorporated into your chest training or balance training routine. You can also refer to our previously provided push day fat loss workout plan for a more structured approach.
Are you ready to take on the challenge?
