In our previous article, we explained what upper crossed syndrome is and covered neck and shoulder release and strengthening exercises.
As shown in the diagram, upper crossed syndrome is mainly caused by:
- Weak neck and upper back muscles
- Tight chest and shoulder muscles
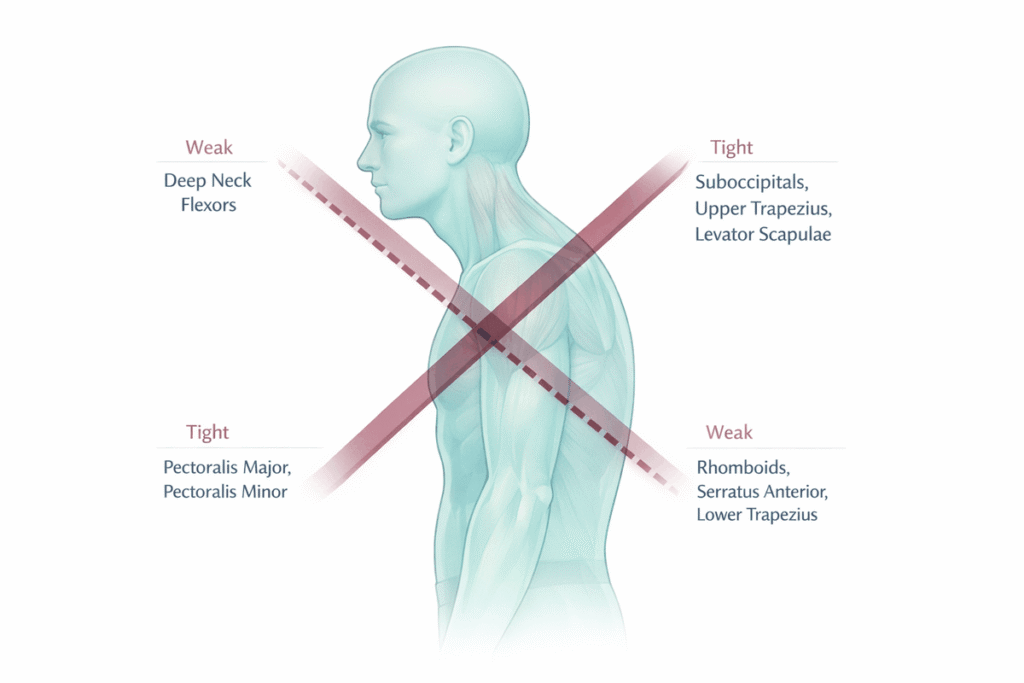
Today, we will focus on how to fix upper crossed syndrome by addressing the chest and upper back musculature.
Upper Crossed Syndrome Exercises for Upper Back
From the neck and shoulders, we now move to the upper back.
The primary weak muscles include:
- Lower trapezius
- Rhomboids
- Posterior deltoid
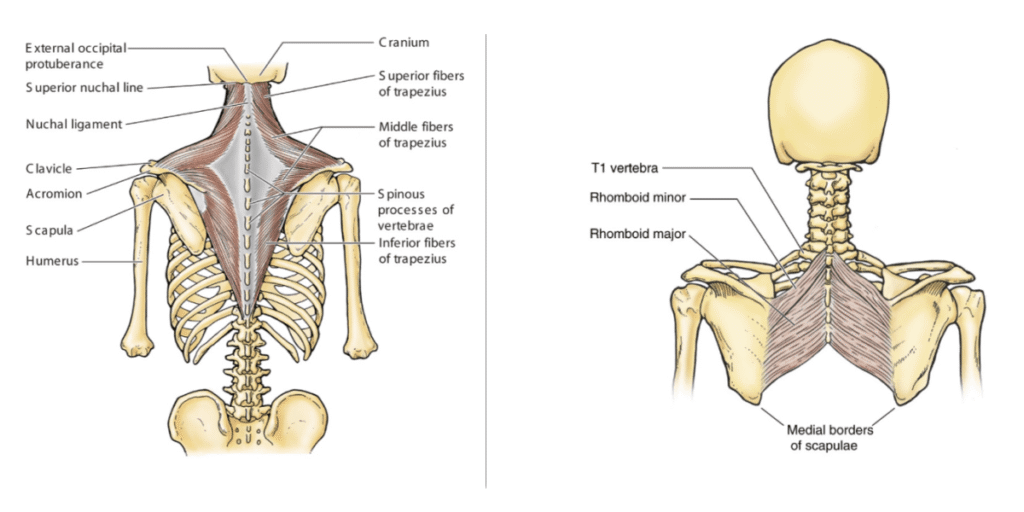
As shown in the image, the left diagram illustrates the trapezius anatomy, and the right shows the rhomboids.
The trapezius has three regions: upper, middle, and lower fibers.
Why Is the Upper Trap Tight but the Middle and Lower Weak?
Because daily life rarely requires us to use the middle and lower trapezius.
- Middle trapezius → scapular retraction
- Lower trapezius → scapular depression + upward rotation
Most daily movements involve pushing forward, not pulling back.
The rhomboids, located deep beneath the trapezius, also retract the scapula and become weak for the same reason.
The good news:
Exercises targeting the middle trapezius will also train the rhomboids.
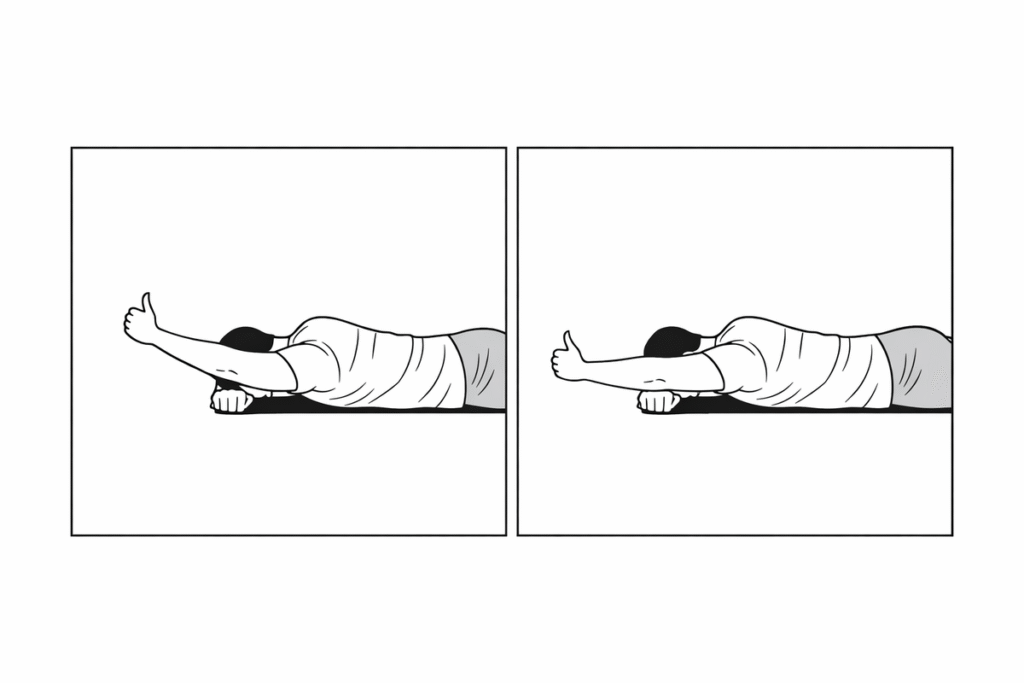
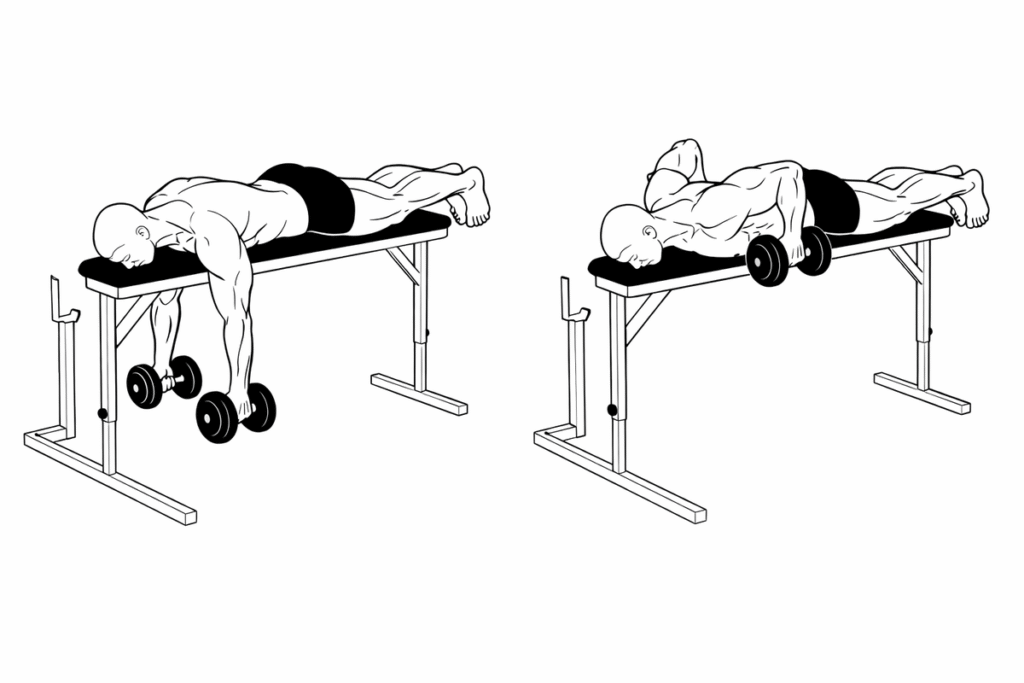
Lower Trapezius Exercise (Y Raise)
- Lie prone, arms lifted in a “Y” shape
- Make fists with thumbs pointing upward
- Lift arms off the floor while keeping head and chest down
- Lower slowly; repeat 8–10 reps
This feels difficult at first because it isolates the lower trapezius.
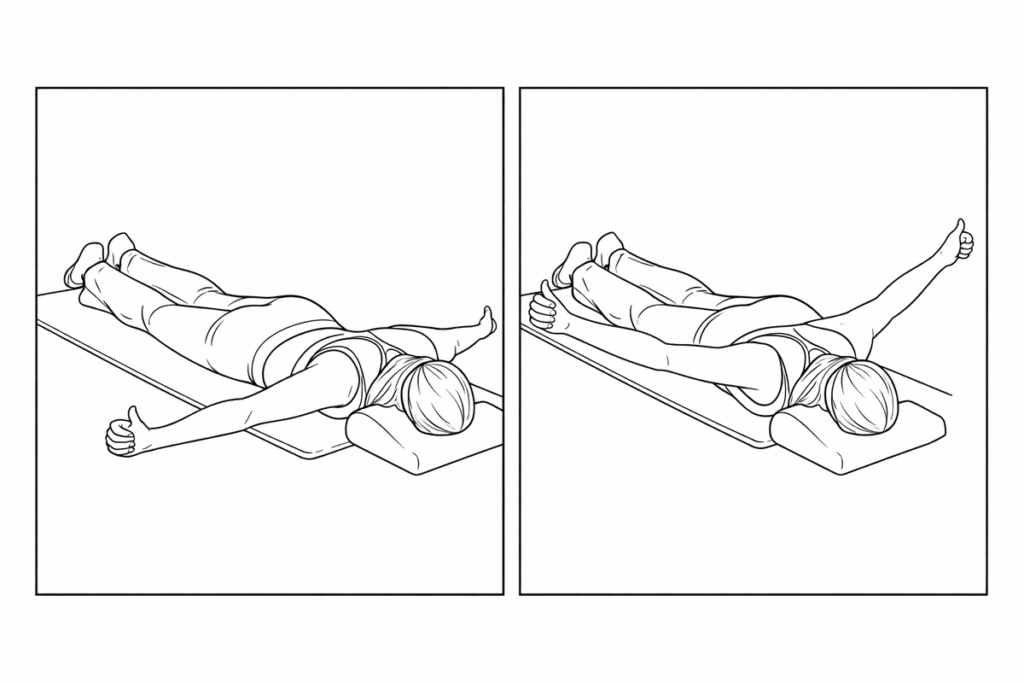
Regression
- Lie prone, one hand under forehead
- Other arm forms a Y
- Lift arm; if difficult, gently rotate torso using forehead support
- Switch sides; 8–10 reps each
Begin with 1 set of 8–10 reps. Progress to 10–15 as strength improves.
Advanced Version
Use an incline bench and hold dumbbells while performing the same Y raise.
Important: Always keep thumbs pointing upward to maintain shoulder external rotation and promote neutral scapular positioning.
Middle Trapezius / Rhomboid Exercise (T Raise)
The movement is similar to the Y raise, except the arms form a T shape.
- Lie prone, arms abducted 90°
- Thumbs up
- Lift arms and squeeze shoulder blades
- Keep head and chest down
- 8–10 reps
Avoid shoulder shrugging — that indicates upper trapezius dominance.
Resistance Training for Trapezius
For trained individuals:
- Lat pulldown → strengthens lower trapezius through controlled scapular depression
- Wide-elbow seated row → targets middle trapezius via scapular retraction
Posterior Deltoid
The posterior deltoid performs:
- Horizontal extension
- External rotation
Rounded shoulders often involve internal rotation of the humerus — a sign of weak posterior deltoids.
Key principle:
Keep scapula stable. Move through the shoulder joint.
Dumbbell Seal Row
- Lie face down on a bench
- Hold dumbbells
- Pull elbows to 90° with arms abducted
- Keep scapula stable
Prone position reduces core demand and isolates the target muscles.
Incline Reverse Fly
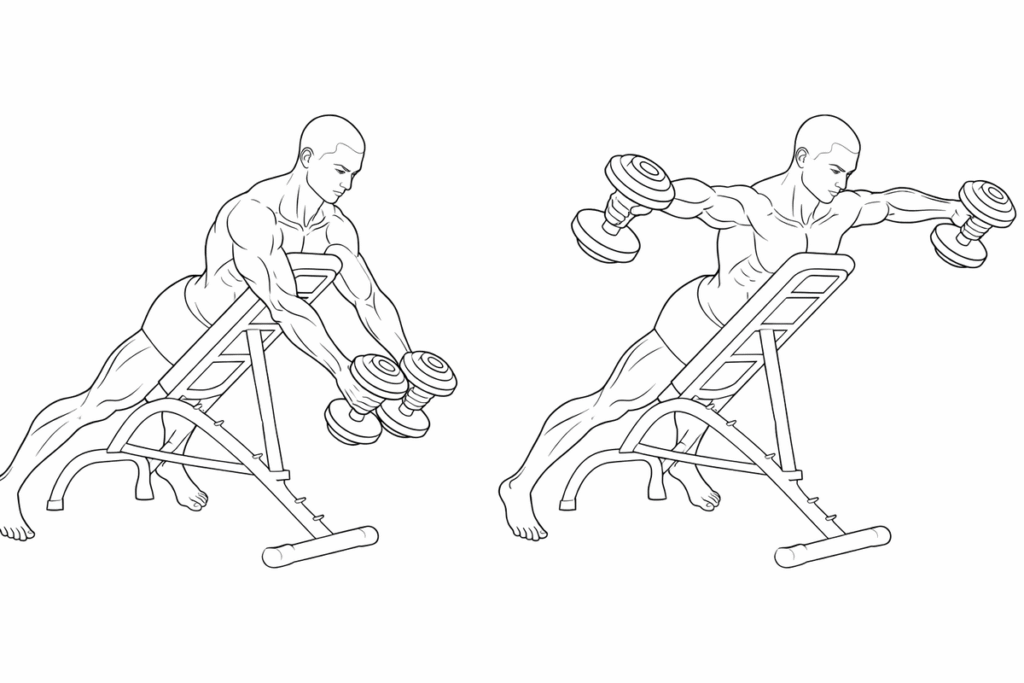
- Lean against incline bench
- Hold dumbbells
- Raise arms laterally with minimal elbow bend
Chest Muscles in Upper Crossed Syndrome
The pectoralis major and pectoralis minor are among the most affected muscles in upper crossed syndrome.
It is the tightness of these two muscles that pulls the shoulders and arms forward, ultimately leading to rounded shoulders.
Before discussing treatment, let’s briefly review their anatomy.
As shown in the diagram below, the image illustrates the pectoralis major and pectoralis minor.
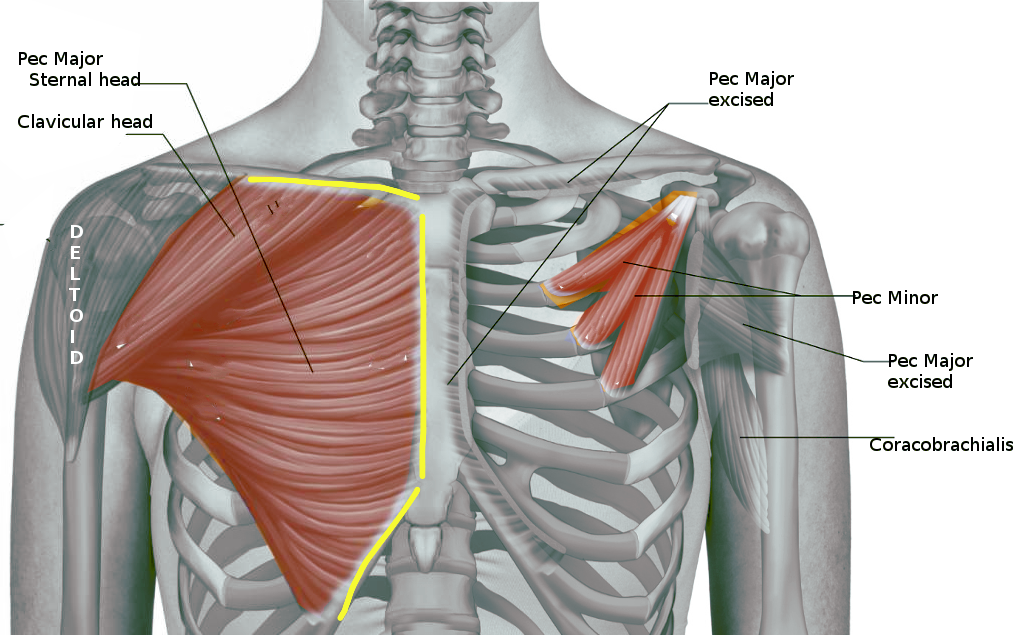
Pectoralis Major
The pectoralis major originates from:
- The medial two-thirds of the clavicle
- The lateral border of the sternum
- The anterior sheath of the rectus abdominis
- The costal cartilages
It inserts onto the greater tubercle of the humerus.
Function of the Pectoralis Major
Its primary functions include:
- Shoulder flexion
- Horizontal flexion (bringing the arm forward across the body)
- Adduction of the shoulder and humerus
- Internal rotation of the humerus
The pectoralis major has three distinct fiber directions, meaning three different lines of pull.
Among them, the middle and lower fibers share similar stretching mechanics and are relatively easier to address.
Pectoralis Major (Middle Fibers) Stretch
- Stand beside a pillar or upright support. Raise the arm so the upper arm is at 90° relative to the torso.
- Externally rotate the forearm and place the entire forearm against the pillar.
- Gently press the forearm into the pillar while rotating the torso forward, lengthening the chest.
- Hold for 30 seconds.
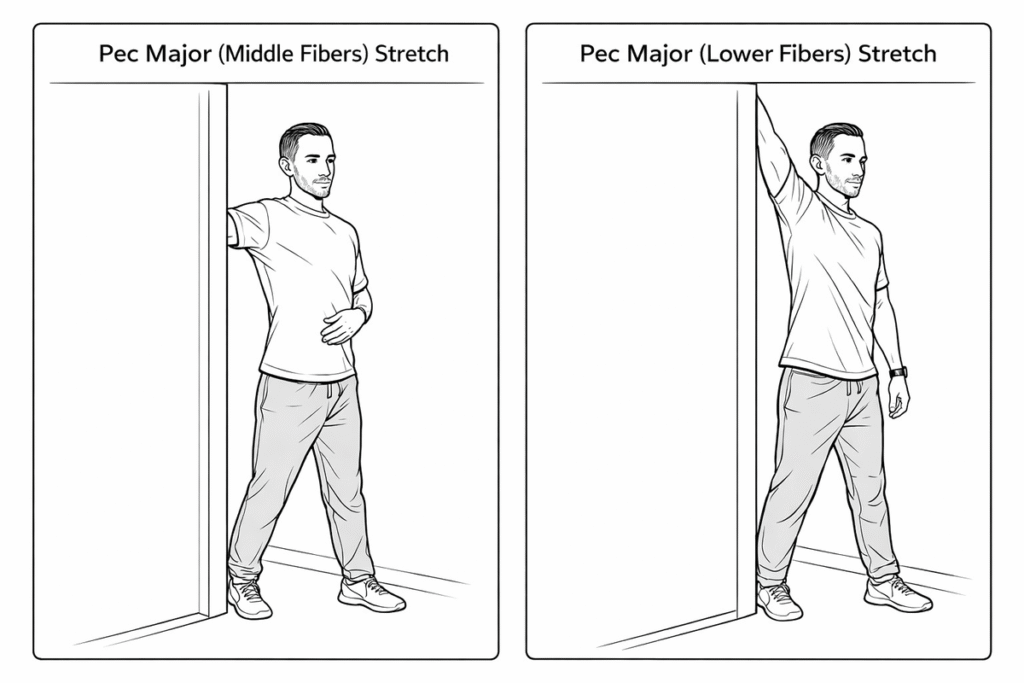
Pectoralis Major (Lower Fibers) Stretch
The only modification required is increasing the angle of shoulder elevation.
Raise the upper arm from 90° to approximately 120°, then perform the same rotational stretch.
Pectoralis Major (Upper Fibers) Release — Passive Technique
For the upper fibers, manual pressure at the origin is more effective.
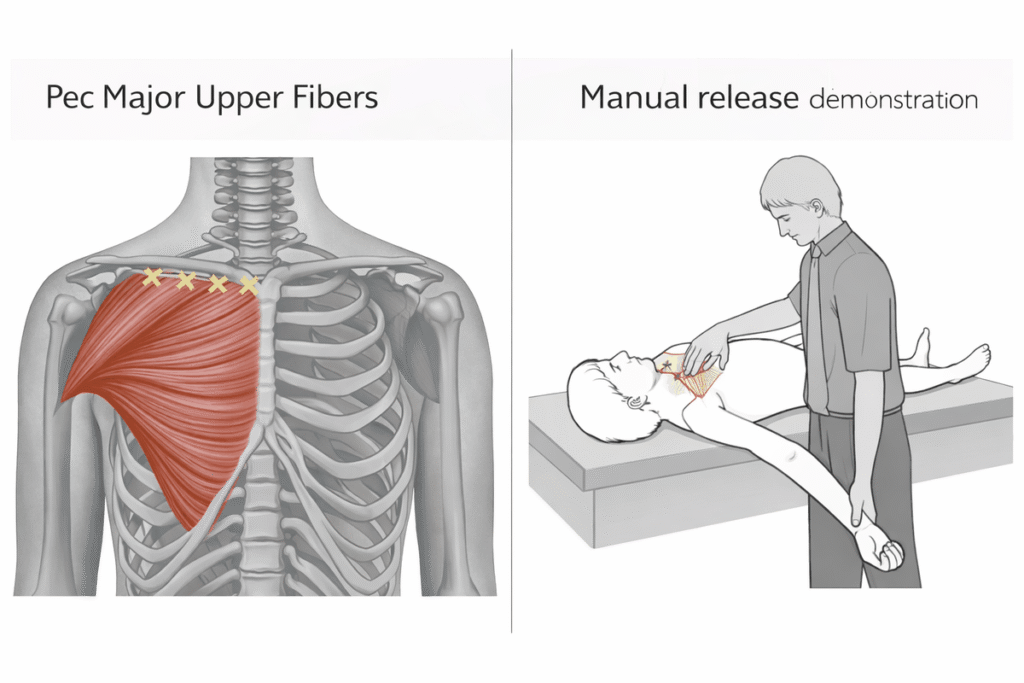
- One person lies supine on a training bench.
- The assistant overlaps both thumbs and presses firmly into the upper fibers of the pectoralis major.
- Apply pressure along the medial two-thirds of the clavicle, moving point by point from left to right.
- Press for 1 second → pause 1 second → release 1 second → then move to the next point.
After releasing the pectoralis major, the next step is addressing the pectoralis minor.
Pectoralis Minor
Refer again to the diagram — the right image shows the anatomy of the pectoralis minor.
The pectoralis minor consists of three bundles attaching to:
- The anterior surfaces of ribs 3, 4, and 5
- The coracoid process of the scapula
From the anatomical illustration, it is clear that when the pectoralis minor becomes tight, it pulls the scapula forward and downward at an oblique angle.
This causes anterior tilting of the scapula and prominence of its inferior angle — a presentation often associated with a form of scapular winging (which we will discuss separately in a future article).
For individuals who train regularly, excessive tightness in the pectoralis minor can also limit force production during the bench press.
Pectoralis Minor Release Exercise
- Locate the anterior axillary line. Have a partner overlap their hands and apply pressure to the midpoint of that line to stabilize the pectoralis minor.
- With the palm facing forward, initiate small shoulder abduction movements.
- Start with 30° abduction and repeat 3 times.
- Progress to 60° abduction for 3 repetitions.
- Finally, move toward 80° abduction and perform 10 repetitions.
Important:
True release of the pectoralis minor begins around 80° of abduction.
The earlier angles primarily help the body adapt to the stretch.
If available, a lacrosse ball or massage ball may be used instead of manual pressure.
Active Pectoralis Major Stretch
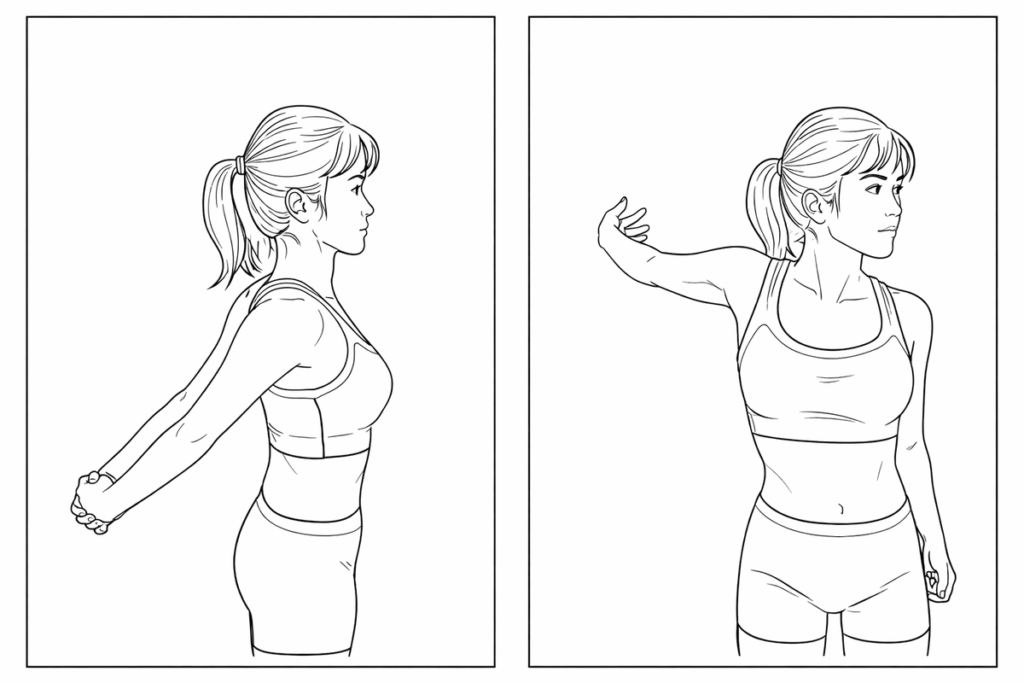
In addition to the techniques above, the following simple stretches are effective :
- Interlace the hands behind the back and lift the arms upward to extend the chest.
- Place one hand on a wall and rotate the torso away from the arm.
Passive Pectoralis Major Stretch (Partner Assisted)
Two additional passive stretches can be performed with assistance:
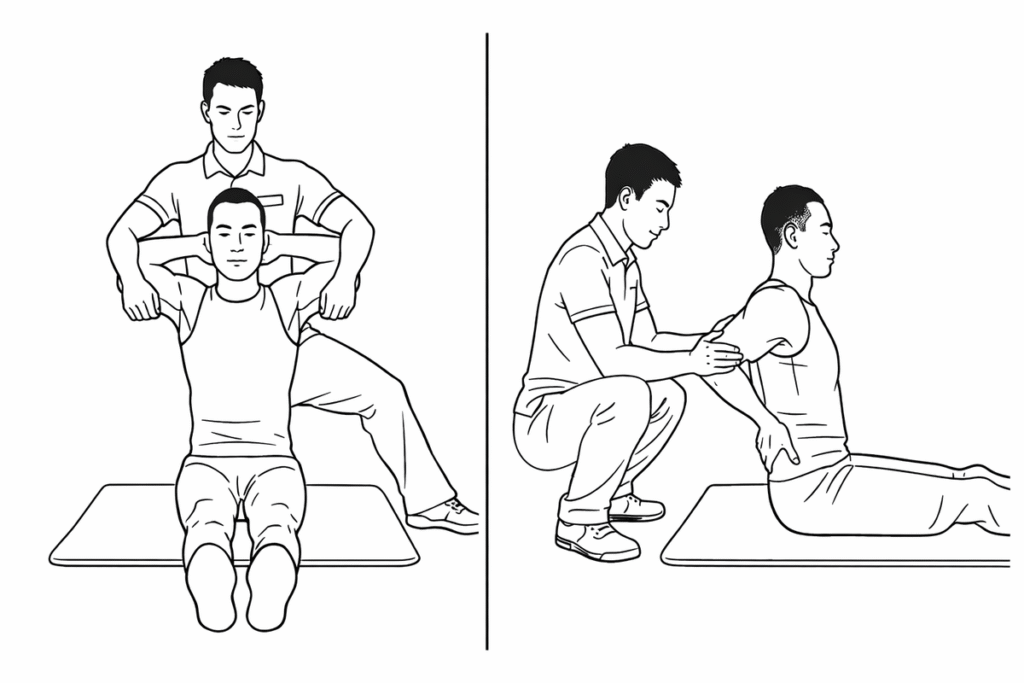
- Left image: Hands lightly interlaced behind the head while a partner gently pulls both elbows backward — primarily stretches the upper fibers.
- Right image: Hands placed at the sides of the waist while a partner pulls the elbows backward — primarily stretches the middle fibers.
Final Considerations
Combined with the previously discussed neck and shoulder exercises, these movements can significantly improve upper crossed syndrome by restoring muscular balance.
You may notice that one muscle from the original diagram has not yet been addressed — the serratus anterior.
Because the serratus anterior is closely related to scapular winging — a condition with multiple variations — we will dedicate a separate article to its release and strengthening strategies.
Lastly, pay close attention to muscular balance in your daily life.
Posture is not shaped by a single workout, but by consistent repetition.
If this article didn’t fully meet your needs, we’ve also put together other recommended articles on upper crossed syndrome treatment.
